

Zone Application & Allocation
Zone Application & Allocation
How & How Much

In Part One, I explained how to determine three target intensities:
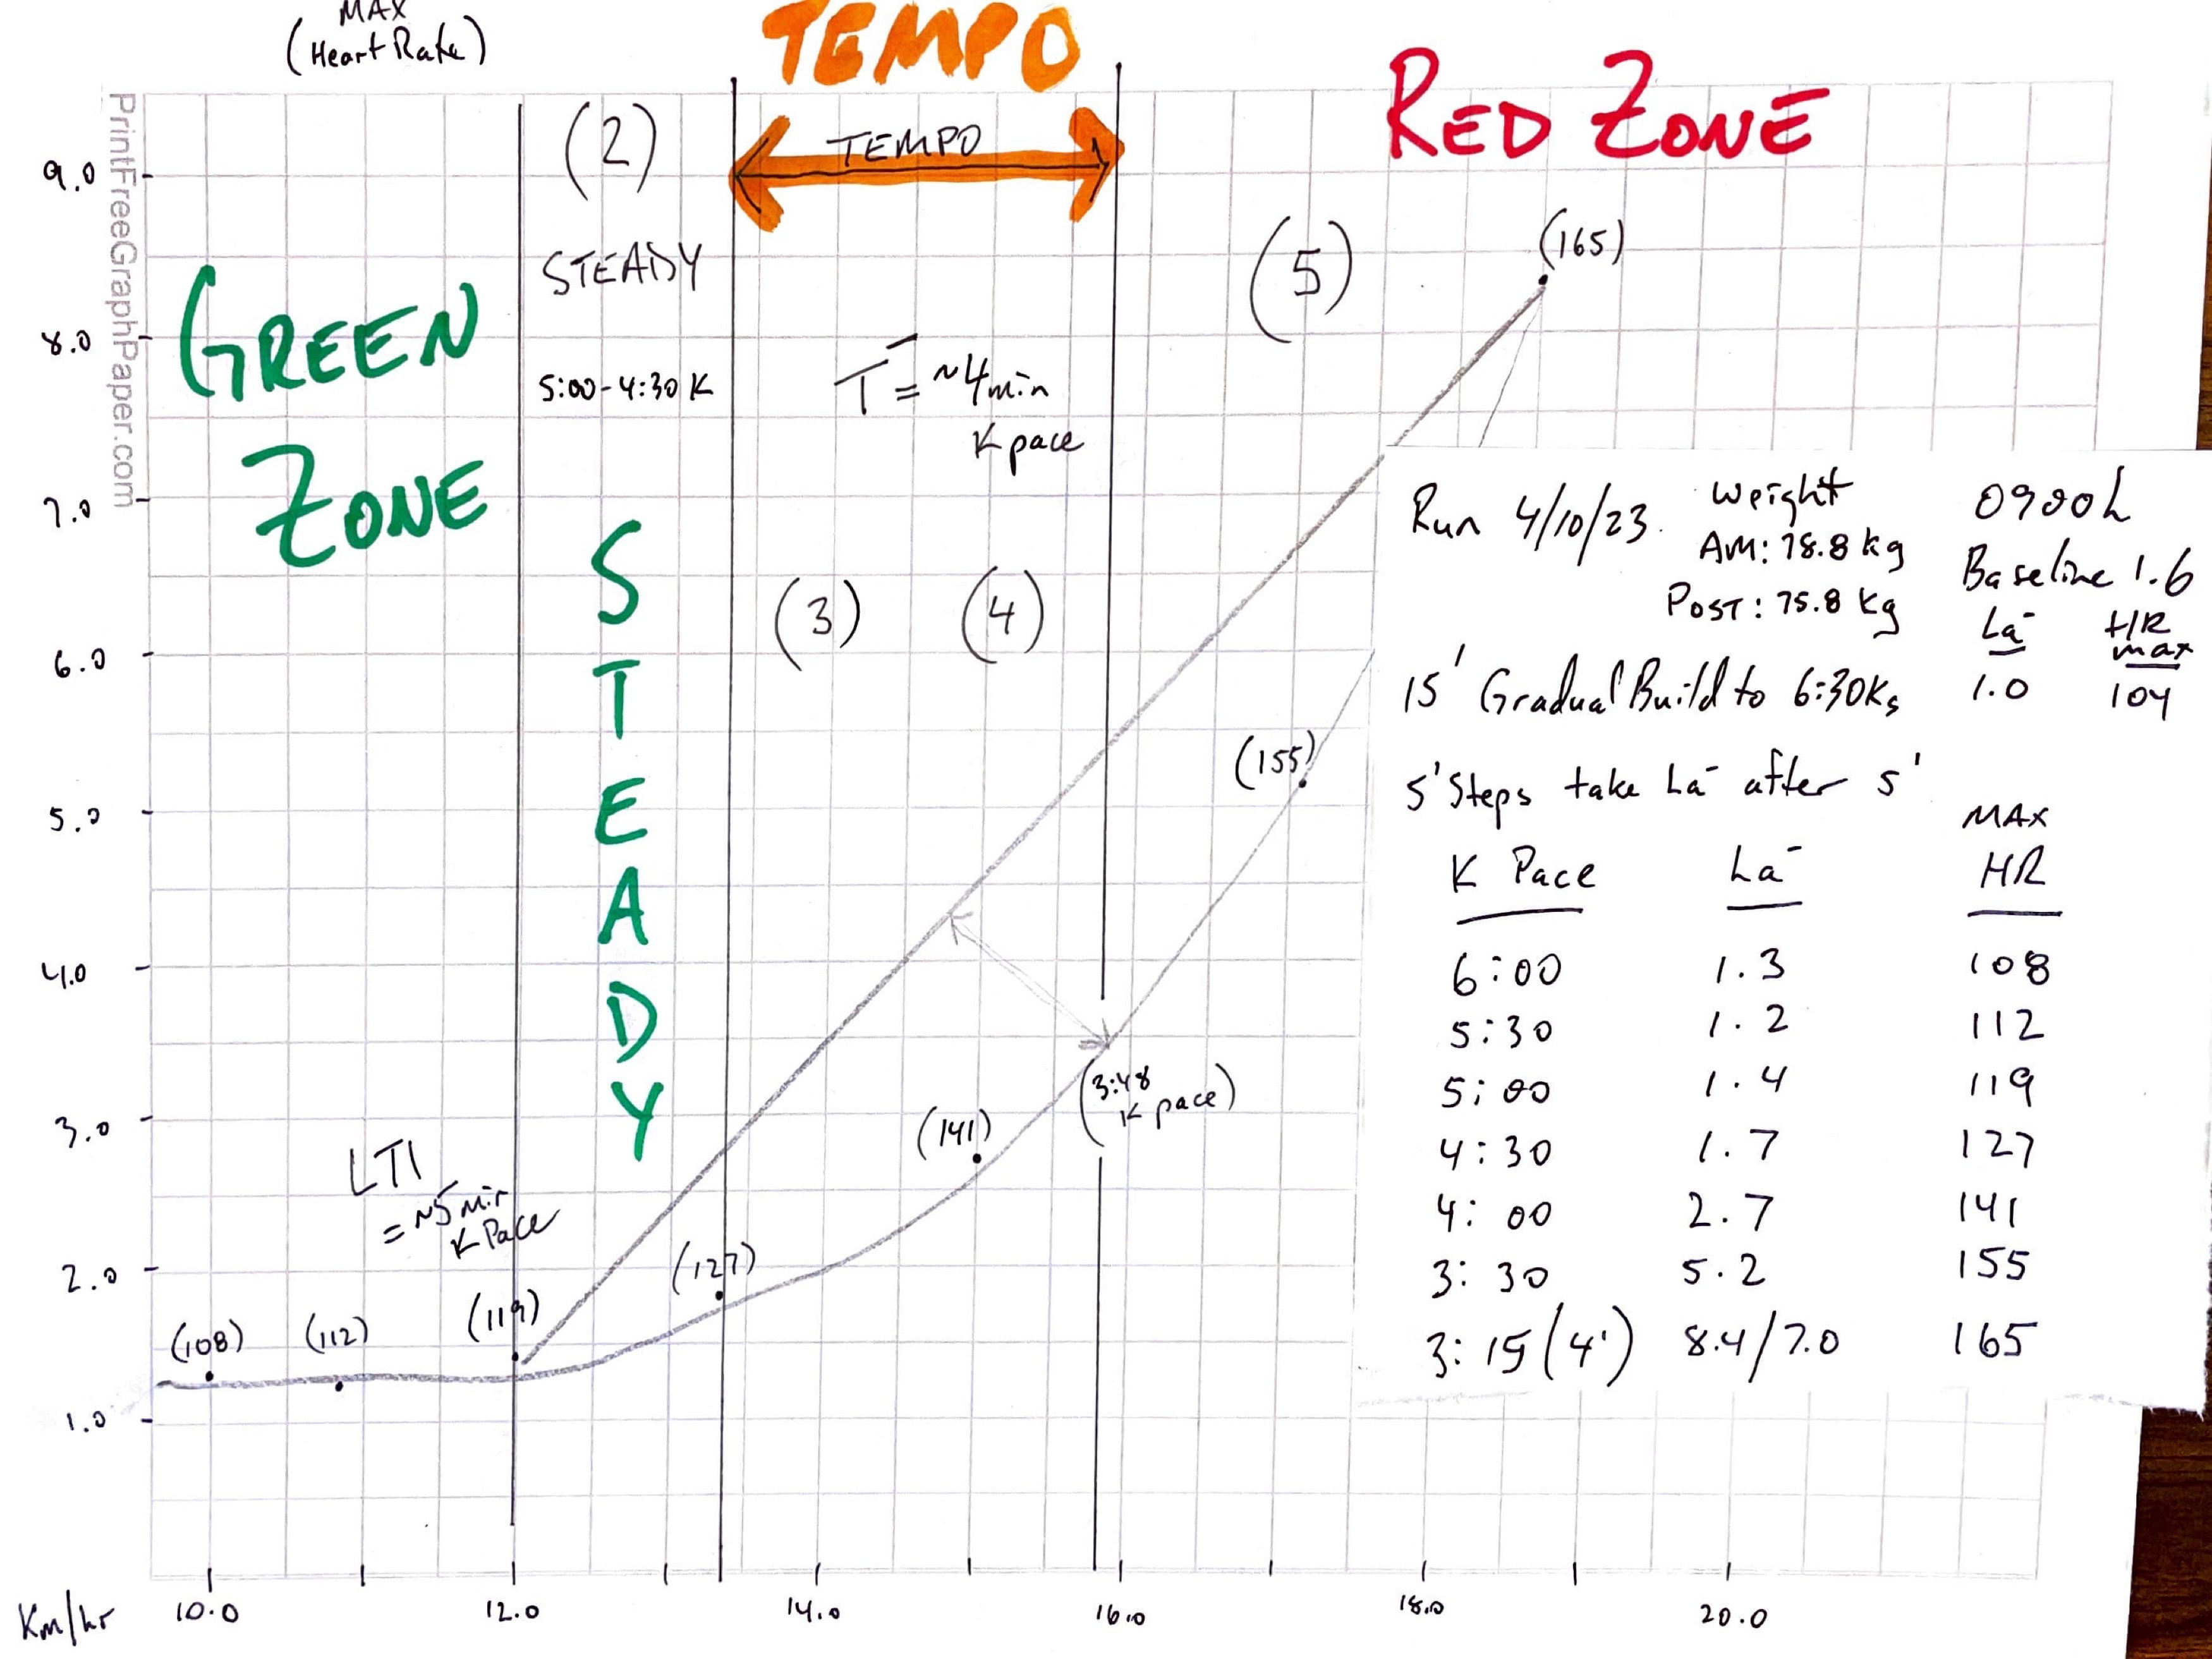
Green Zone
Tempo
Red Zone
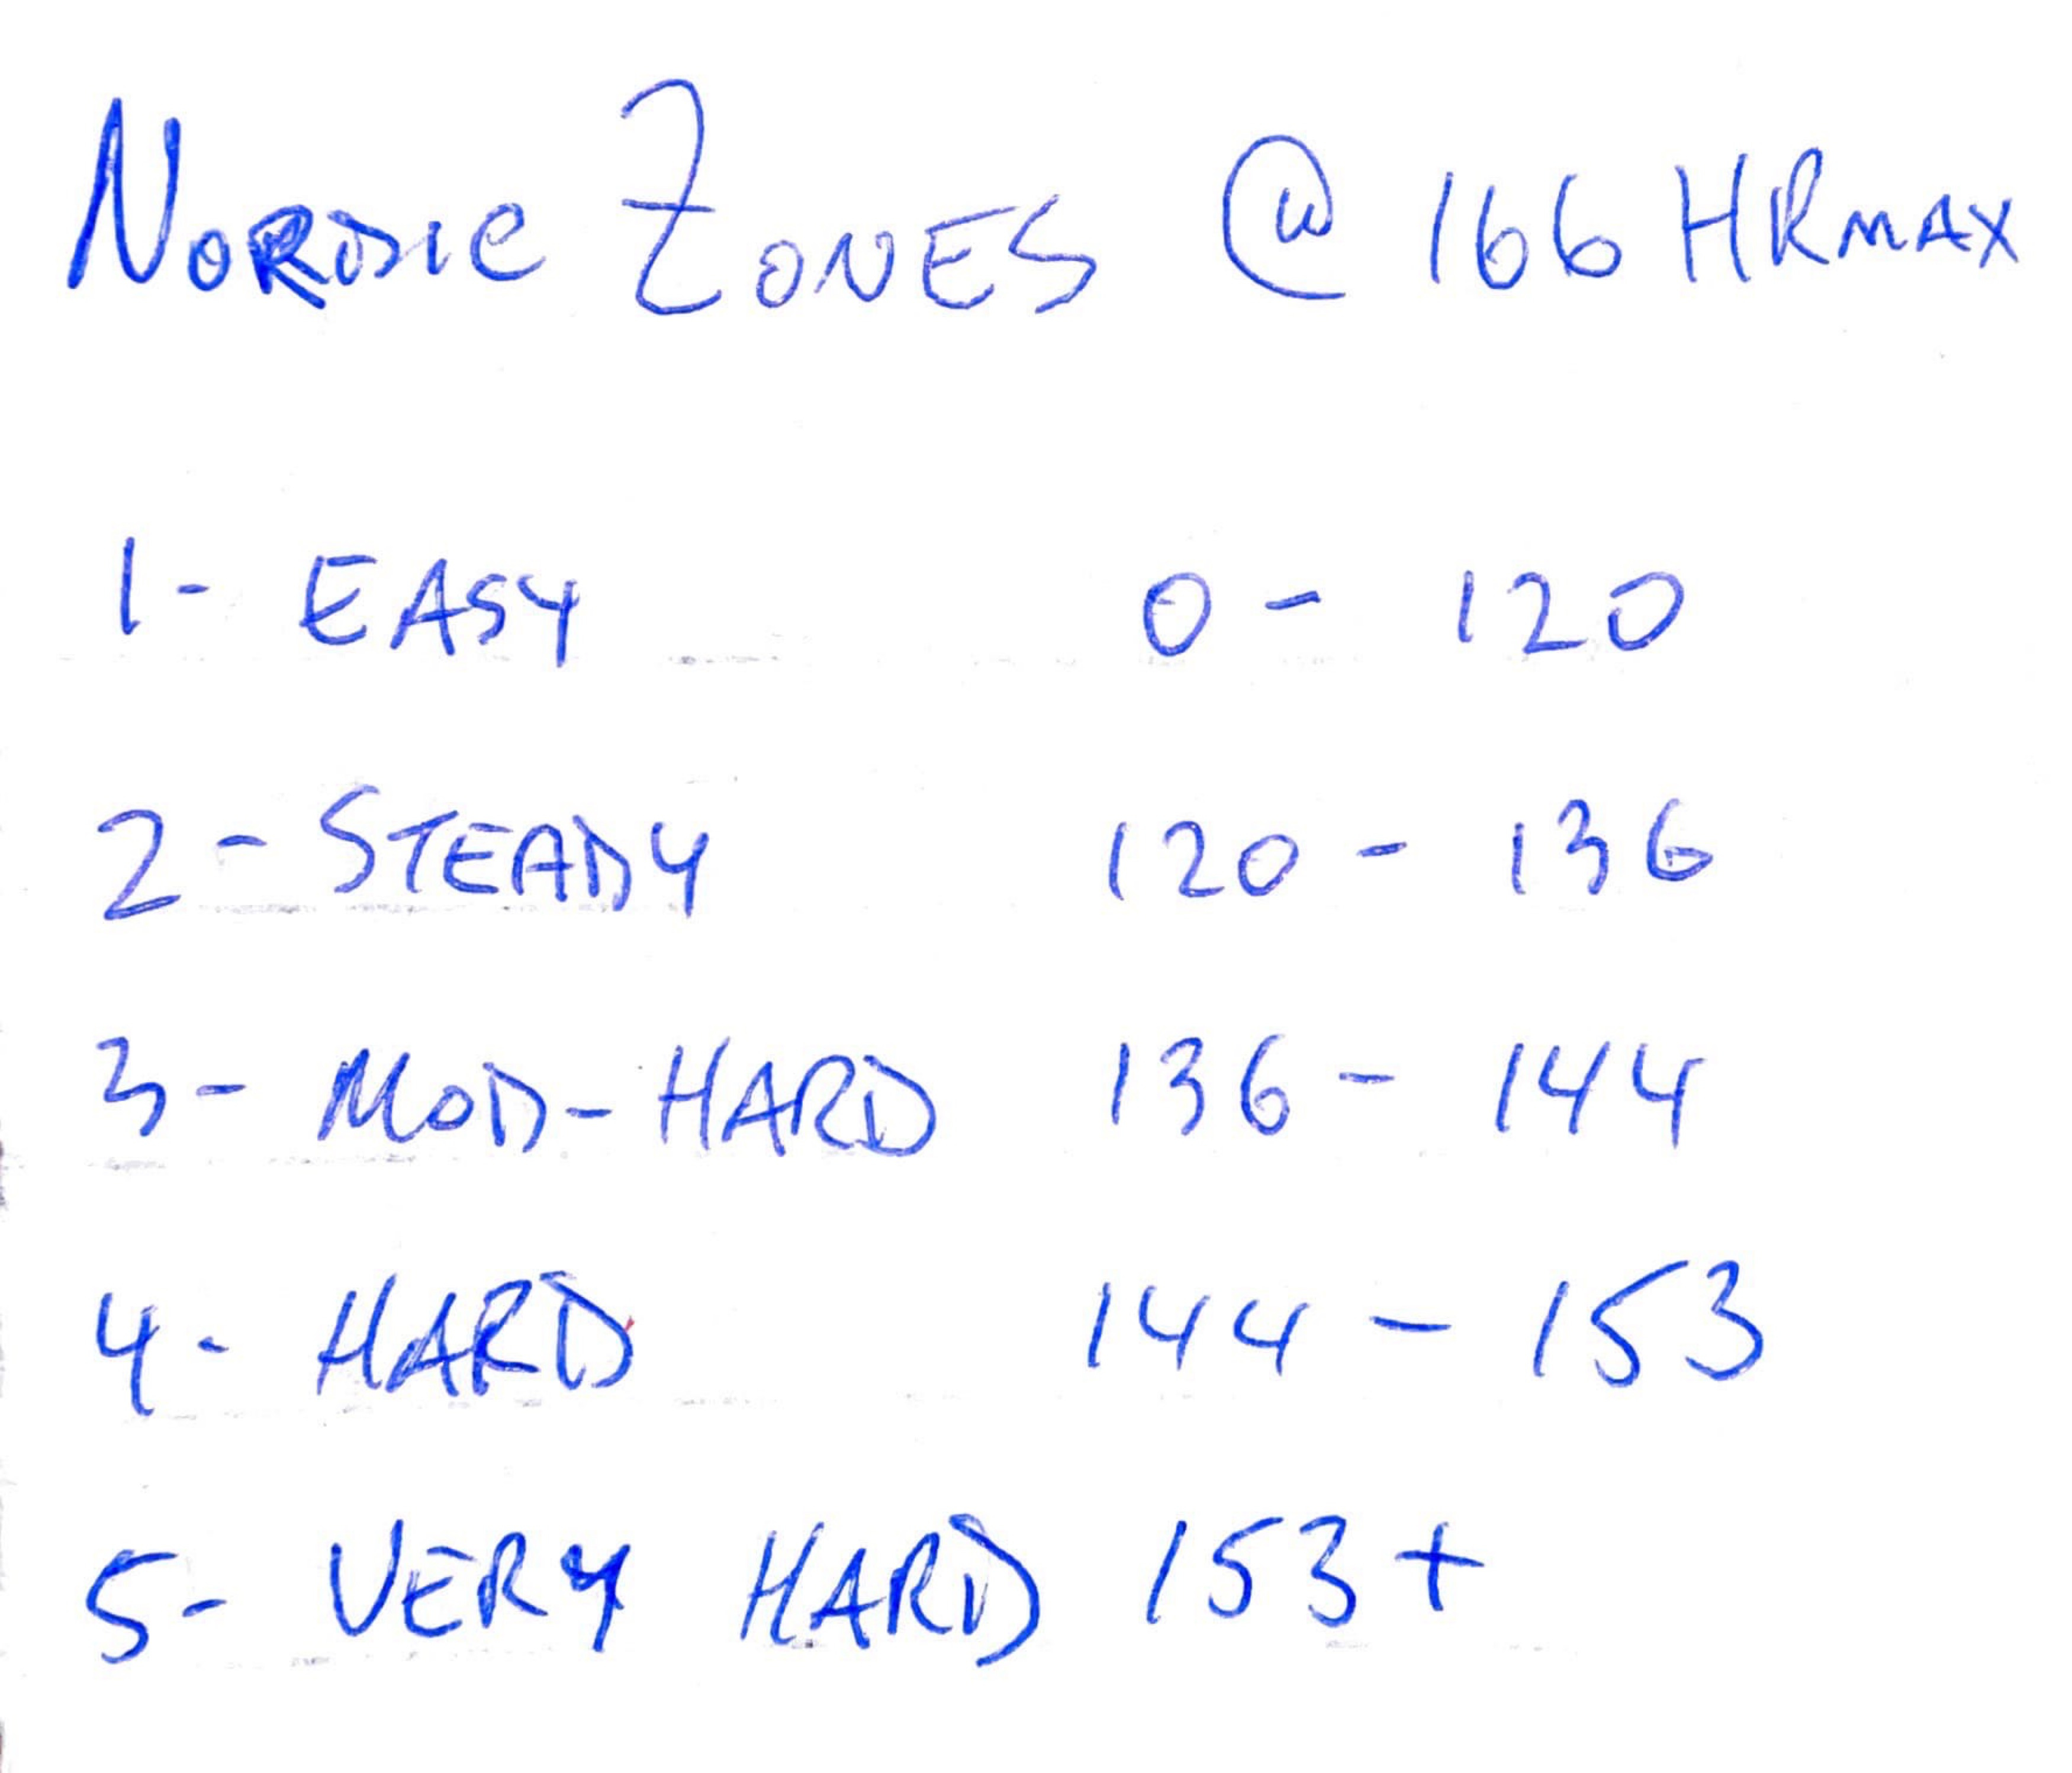
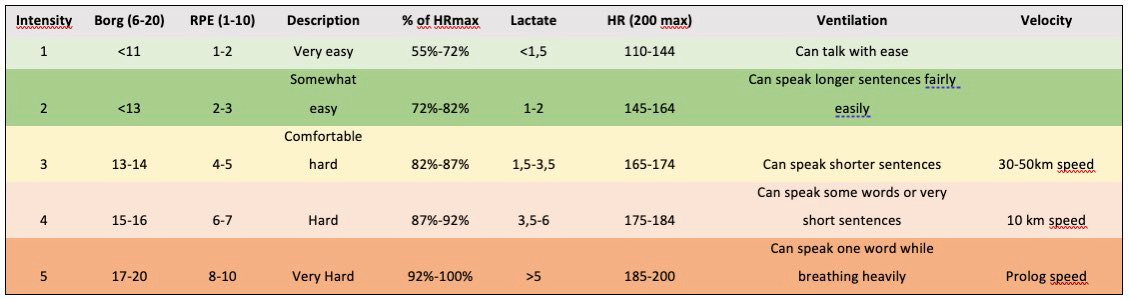
Across those targets I explained five intensity zones:
Easy
Steady
Moderately-Hard
Hard
Very Hard
If you are interested in learning more about these zones then please refer to our previous article, Building Athlete Profiles. Inside you’ll find John Hellemans’ five-zone system.
Gaps & Caps
The targets for Green-Tempo-Red have gaps between them.
Some of these gaps are large, especially the gap between the Tempo & Red Zone.
The Tempo target is set at the border between Zone 3 & 4.
The Red Zone target is set as best 6 minute power/pace.
Depending on athlete fitness, the Tempo target can be sustained for 1-4 hours, or more.
Why such a big gap?
In a word, or two… Energy Management.
All three targets are set conservatively. Rather than nudging intensity upwards, increase session frequency and duration. Take advantage of the conservative targets to roll up more time at a given intensity.
Each target intensity is set high enough to cause a specific adaptation.
Do enough to create a small adaptation.
Absorb the stress.
Repeat.
Athletes are constantly tempted to nudge intensity up, and give themselves more than they can absorb. Heart rate caps have a role to play in better dosing.
The top half of Zone 2 and 4 represent metabolic grey zones. As explained in Part One’s videos, they are transition areas. The natural variation in training powers/paces means the physiological nature of the session changes around these areas.
By capping Green Zone efforts at the middle of Zone 2, and Tempo efforts at the middle of Zone 4, we avoid changing the nature of the session.
Using the sample set of zones (above), the instruction for the athlete would be…
Endurance Effort, use a hard cap of 128 bpm and spend most of your time 115-123 bpm.
Tempo Effort, build to the low 140s, stay under 148 bpm.
Importantly, if power/pace are dropping and the athlete is approaching the heart rate cap then the athlete has given themselves enough stress and can back off, or shut the session down.1
Afterwards, the athlete should consider:
Was the target set too high?
Was there an error relative to conditions? For example, targets should be adjusted downwards in high heat.
Was there an error in execution? Fast start, lack of fluids, poor nutrition, frequent brief spiking one (or more) zone higher.
There isn’t always a reason, and that’s OK. The game is compound load over time. There’s no need to overthink it.
Real-World Application
A heart rate cap is NOT a target.
The heart rate caps are an early warning system that the workout nature is about to shift. Know the session goals and use heart rate caps to keep from creating strain.2
In time, the athlete will need to add Specific Capacity sessions. These sessions will be targeted based on the athlete’s goal event and may fall between the three targets (Green-Tempo-Red).3
Athletes will be moving up and down their intensity profiles across the week as they transition from different targets and terrains. This is OK. What I’m encouraging is the avoidance of sitting in the transition zones.
The key thing I want you to remember => Volume Is A Good Explanation
These targets will result more work done and, hopefully, more enjoyment from your program. They will also ensure the General Capacity, and mojo, to perform when it matters.
Zone Allocation
If the #1 Error is training too intensely then the #2 error is too much Tempo and Red Zone work.
Here is a starting point for training intensity allocation.
Force (10%) - Always maintain a Force component in your week. John and I gave you many ideas in the Strength Section.
Green Zone (80%) - As you build General Capacity you will be able to fit more and more into this allocation (hills, terrain, pace changes). This drives endurance performance.
Tempo & Red Zone (10%) - Use a 9/1 split for Tempo/Red Zone. For a 15-hour week (900 minutes) this implies 9 minutes of Red Zone per week.
Target your intense sessions with precision and intent.
Place these sessions when, and where, you will most benefit from them.
Gains come from getting the 90% right and not wrecking ourselves with the 10%.
Endurance, Strength, Sleep & Nutrition => that’s where the action’s at.
If you seek to compete with athletes one level up from you.4 Allocate even more to Green Zone & Strength, with an emphasis on Easy training to improve metabolic fitness and increase work capacity.
If the above allocation results in unusual fatigue then assume there’s “hidden intensity” in the program. I discussed where to look, and how to solve, in My Metabolic Manifesto.
Have Fun - Keep It Simple - Persist
Back to Table of Contents
More information in my video on Decoupling & Duration Curves.
Stephen Seiler’s presentation on Load, Stress & Strain is excellent.
Athlete Levels discussed in Three Types of Athlete.
Gordo - following you for ten+ years. I always appreciate the clarity and sanity that you bring to all that you write about. I run a large lifestyle medicine practice that targets type 2 diabetes remission and a lifelong runner. We are all somewhere on the physiological continuum from metabolic dysfunction (diabetes) to elite performance. Understanding these principles are as important for the athlete as the patient. I’d love to get you on our podcast.